
Sign In to Your Account
Subscribers have complete access to the archive.
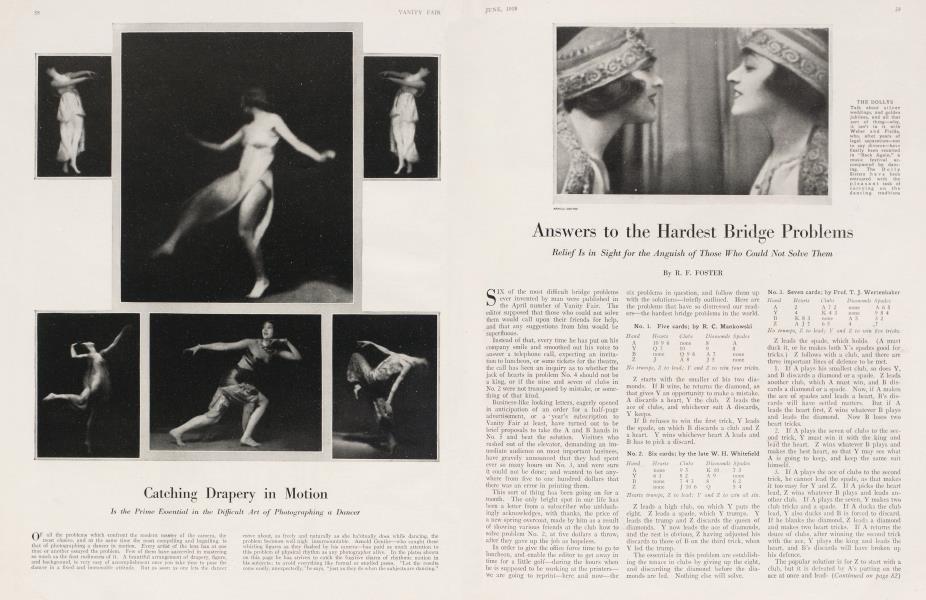
Sign In Not a Subscriber?Join NowAnswers to the Hardest Bridge Problems
Relief Is in Sight for the Anguish of Those Who Could Not Solve Them
R. F. FOSTER
SIX of the most difficult bridge problems ever invented by man were published in the April number of Vanity Fair. The editor supposed that those who could not solve them would call upon their friends for help, and that any suggestions from him would be superfluous.
Instead of that, every time he has put on his company smile and smoothed out his voice to answer a telephone call, expecting an invitation to luncheon, or some tickets for the theatre, the call has been an inquiry as to whether the jack of hearts in problem No. 4 should not be a king, or if the nine and seven of clubs in No. 2 were not transposed by mistake, or something of that kind.
Business-like looking letters, eagerly opened in anticipation of an order for a half-page advertisement, or a * year's subscription to Vanity Fair at least, have turned out to be brief proposals to take the A and B hands in No. 5 and beat the solution. Visitors who rushed out of the elevator, demanding an immediate audience on most important business, have gravely announced that they had spent ever so many hours on No. 3, and were sure it could not be done; and wanted to bet anywhere from five to one hundred dollars that there was an error in printing them.
This sort of thing has been going on for a month. The only bright spot in our life has been a letter from a subscriber who unblushingly acknowledges, with thanks, the price of a new spring overcoat, made by him as a result of showing various friends at the club how to solve problem No. 2, at five dollars a throw, after they gave up the job as hopeless.
In order to give the office force time to go to luncheon, and. enable the editor to get away in time for a little golf—during the hours when he is supposed to be working at the printers— we are going to reprint—here and now—the
six problems in question, and follow them up with the solutions—briefly outlined. Here are the problems that have so distressed our readers—the hardest bridge problems in the world.
No. 1. Five cards; by R. C. Mankowski
Hand Hearts clubs Diamonds Spades A 1096 none 8 A Y Q7 10 9 8 B NONE q96 A7 none Z J A8 J5 none
No trumps, Z to lead; Y and Z to win four tricks.
Z starts with the smaller of his two diamonds. If B wins, he returns the diamond, as that gives Y an opportunity to make a mistake. A discards a heart, Y the club. Z leads the ace of clubs, and whichever suit A discards, Y keeps.
If B refuses to win the first trick, Y leads the spade, on which B discards a club and Z a heart. Y wins whichever heart A leads and B has to pick a discard.
No. 2. Six cards; by the late W. H. Whitefield
Hand Heartd Clubs Diamonds Spades A none 95 K10 73 Y 63 82 A9 none B none 743 8 62 A none J10 6 Q 54
Hearts trumps, Z to lead; V and Z to win all six.
Z leads a high club, on which Y puts the eight. Z leads a spade, which Y trumps. Y leads the trump and Z discards the queen of diamonds. Y now leads the ace of diamonds, and the rest is obvious, Z having adjusted his discards to those of B on the third trick, when Y led the trump.
The essentials in this problem are establishing the tenace in clubs by giving up the eight, and discarding the diamond before the diamonds are led. Nothing else will solve.
No. 3. Seven cards; by Prof. T. J. Wertenbakcr
Hand Heartd Clubs Diamonds Spades A 2 A 72 none A 65 Y 4 K43 none 984 B K83 none A5 32 Z AJ7 65 4 7
No trumps, A to lead; Y and Z to win five tricks.
Z leads the spade, which holds. (A must duck it, or he makes both Y's spades good for tricks.) Z follows with a club, and there are three important lines of defence to be met.
1. If A plays his smallest club, so does Y, and B discards a diamond or a spade. Z leads another club, which A must win, and B discards a diamond or a spade. Now, if A makes the ace of spades and leads a heart, B's discards will have settled matters. But if A leads the heart first, Z wins whatever B plays and leads the diamond. Now B loses two heart tricks.
2. If A plays the seven of clubs to the second trick, Y must win it with the king and lead the heart. Z wins whatever B plays and makes the best heart, so that Y may see what A is going to keep, and keep the same suit himself.
3. If A plays the ace of clubs to the second trick, he cannot lead the spade, as that makes it too easy for Y and Z. If A picks the heart lead, Z wins whatever B plays and leads another club. If A plays the seven, Y makes two club tricks and a spade. If A ducks the club lead, Y also ducks and B is forced to discard. If he blanks the diamond, Z leads a diamond and makes two heart tricks. If A returns the deuce of clubs, after winning the second trick with the ace, Y plays the king and leads the heart, and B's discards will have broken up his defence.
The popular solution is for Z to start with a club, but it is defeated by A's putting on the ace at once and leading back the deuce, B discarding spades. If Y allows Z to win this trick, Z must lead right up to B's defence, or give A two more tricks in the black suits. If Y wins the return of the club, he must lead the heart, and either A or B make i two more tricks.
(Continued on page 82)
(Continued from page 59)
No. 4. Eight cards; by Harry Boardman
Hand Heartd Clubs Diamonds Spades A Q7 K5 10975 none Y J64 A4 QJ3 none B A83 1073 none 62 Z 652 J86 none 85
Hearts trumps, Z to lead; Y and Z to zvin six tricks.
Z starts with the eight of spades. (Neither the small spade nor the deuce of trumps will solve.) A trumps with the queen, and Y under-trumps with i the six. This is to prevent A from I defeating the solution by a trump lead.
A leads a small diamond and Y wins it with the jack, B and Z both discarding clubs. Y now leads the jack of trumps, which B ducks. Y then leads the high diamond. If B discards another club, Z trumps with the five and leads a spade, upon which Y saves his four of trumps. Y leads the ace of clubs and the nine of trumps must make.
The importance of leading the jack of trumps at the third trick, the moment B refuses to trump the diamond, is one of the beauties of this problem. If Y goes on with the queen of diamonds, before leading that jack of trumps, B will discard another club and make a spade trick.
If A refuses to trump the first trick of all, discarding a diamond, Y gets rid of the small club and Z leads another spade. If A passes again, Y trumps with the four and leads the queen of diamonds. If B passes up this trick, Y at once makes his ace of clubs, and, if A has only one diamond left, leads the jack of diamonds.
Of the two plausible solutions to this problem, the trump lead can be defeated by A's passing, allowing B to kill the jack with the ace. The three of trumps allows A to make the queen and lead a diamond. B trumps this with the eight, and Z over-trumps with the nine. After Z has made his spade trick he must give B a spade trick, or Y must give A a diamond.
The smaller spade opening allows A to discard a diamond, and forces Y to trump. Y leads the jack of trumps, upon which B puts the ace and leads the six of spades, which A trumps with the queen. Y can either under-trump or discard the small club. If he undertrumps, A leads the king of clubs. If he discards, A leads the diamond and Z is compelled to over-trump B.
No. 5. Eight cards; by Jay Reed Hand Heartd Clubs Diamonds Spades A A10 Q 7 10854 Y 9876 none A K97 B Q43 A 62 AQ Z KJ J8 Q3 J
No trumps, Z to lead; Y and Z to zvin four tricks.
Z starts with a club, and Y discards a heart. There are three strong lines of defence, all difficult to meet.
1. If B leads ace and then queen of spades, Z discards a small heart, and Y lets the spade queen hold. B leads a diamond and Y leads the hearts. If B leads the heart instead of the diamond, the result is the same in the end.
2. If B leads a diamond, instead of the spades, or if he leads the spade ace
and then a diamond, Y leads the hearts,
and the rest is easy.
3. The real trap in the problem comes in the third line of B's defences. Suppose he lets the spades alone and leads a small heart for the second trick?
This is the most difficult defence to meet, chiefly because the attention is so fixed on B's hand that A's is forgotten. Z puts on the jack of hearts. If A wins with the ace and comes right back with the ten, Z wins with the king and makes a club trick, Y discarding a spade.
Now a small diamond puts Y in and he leads the nine of hearts, which forces B to give him a spade trick. If A tries to avoid this ending by leading the spade through Y, instead of coming right back with the heart ten, Y plays a small spade, and B must lead the hearts, or establish the king of spades.
Here comes the play that shows the composer's cunning. When B wins the spade and leads the heart, Z wins the trick and leads the winning club. It looks as if B could discard to beat anything. So he can, but what about A? If B keeps both his diamonds, he can discard the ace of spades, as Z has no more spades. But if A gives up a spade he blocks the diamonds, and Z will lead the three of diamonds, not the queen, and A will lose two spade tricks, because the moment Y sees that A is going to keep the seven of diamonds, Y discards the ace on the club trick. If A discards the diamond, so does Y, and Z puts B in with the heart, so that B loses two diamond tricks.
If Z starts with a small diamond opening, so as to establish a trick with the queen, Y must lead the spade. B wins this and leads the small heart, which A wins and returns. Now the two black aces in B's hand must bring in that heart trick. If Y tries to avoid this by leading the heart for the second trick, A wins the heart and leads the spade, so that B can make the spade queen and lead another heart, establishing the queen.
No. 6. Nine cards; by R. C. Mankowski
Hand Heartd Clubs Diamonds Spades A 952 none A AQ1075 W AKQ4 none none 98432 B J107 K95432 none none Z none AQJ106J10 KJ
Hearts trumps, Z to lead;Y and Z to zvin six tricks.
Z leads the ace of clubs, which A trumps and Y over-trumps with the
queen. Y now leads both his high trumps and then the small one, Z discarding diamonds and spades. As B wins the last round of trumps, he can make the king of clubs, but that is all he can make, and A makes the ace of the suit Z has kept.
If A refuses to trump the first trick, Y discards a spade. Now Z leads a diamond, Y trumps with a high trump, and leads both his high trumps and then the small one. On the first and second trump leads, Z will discard clubs. Then, if B has the best trump for the last round, Z discards a spade, gets in with the clubs, makes the ten of diamonds and loses a spade at the end. But if A has the best trump for the last round, Z then discards the third club, and makes the spade king and ten of diamonds, and loses a club at the end.
The more plausible of the two false solutions is the small club opening. A discards the spade five, and B gets out of the way by giving up his high trumps, so that A shall win the third round. This play obviously makes six tricks impossible.
The defence to the diamond opening is for B to under-trump with a high trump. If Y leads the high trump, B keeps the seven and A keeps the deuce. If Y goes on with a high one, A throws in the nine and Y is left in the lead, so that all he can win is his fourth trump, losing four spades. Y cannot escape this by leading the small trump earlier, as A will win with the nine and lead the deuce.
Subscribers have complete access to the archive.
Sign In Not a Subscriber?Join Now
